vPilot DocumentationClick one of these links to jump down to that section:
TranslationsNote: These translations are for vPilot 1.0. Most of the information is now out of date, especially the sections on configuring model matching and running vPilot over a network.
System Requirements
InstallationAfter you download vPilot, double-click on the downloaded file to start the installation. By default, vPilot is installed into the local application data folder (similar to Google Chrome) so that there can be no file permission problems. If you change the installation folder, be sure to specify a folder that does not need administrator privileges in order for vPilot to be able to write its configuration file. When the installation is complete, you will have the option of launching vPilot. Starting vPilotTo start vPilot, double-click the desktop icon (if you chose to create one during the installation) or locate vPilot in your programs list and launch it from there. vPilot runs externally from the sim so it is not launched from a simulator menu like some other pilot clients are. The first time you run vPilot, you will see a popup window with a message indicating that you have not yet fully configured vPilot. Click the Yes button to open the Settings window and configure vPilot. After vPilot starts, it will immediately attempt to connect to the sim via SimConnect. If the sim is not yet running, it will keep trying every 10 seconds and display a message in the main message area when the connection is finally made. ConfigurationThe Network Tab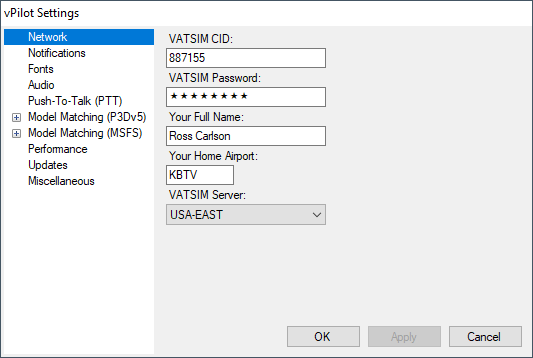
To configure vPilot, click the Settings button. You will see the screen shown at right. This section is mostly self-explanatory. Simply enter your VATSIM credentials, your full name, and your home airport. Also choose which VATSIM server you would like to connect to. You should choose the server that is geographically closest to you. You will be able to see other pilots and controllers that are connected to any server. They are all inter-connected. The Notifications Tab
The items on the Notifications tab allow you to chose which events will cause the task bar to flash when vPilot is not the active window. The checkbox labeled "Show incoming text messages in simulator" allows you to have any incoming radio messages or private messages displayed as text within the sim. This can be handy for users with a single monitor when vPilot is obscured by the simulator window. The Fonts Tab
The fonts tab allows you to choose the font used for displaying text messages and for the controller list. The Audio Tab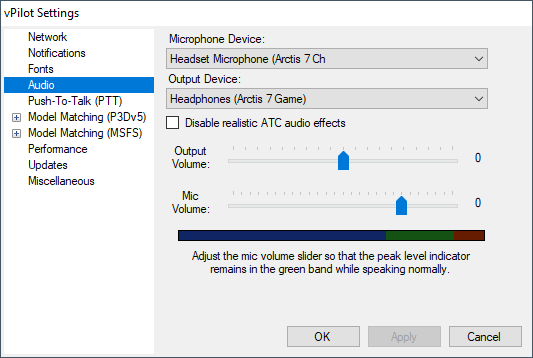
Here you can choose the audio device you wish to use for your microphone to talk to VATSIM controllers, and the audio device to use as the output device for listening to voice transmissions from the controllers and other pilots. If the device is not yet plugged in, you will need to close the Settings window, plug in the device, and then re-open the Settings window. Once you have selected your microphone device, adjust the Mic Volume slider while speaking in a normal voice. Set the volume such that the meter is mostly in the green band. This will help ensure that you can be heard clearly by other pilots and controllers on the network. If you check the box labeled "Disable realistic ATC audio effects" the incoming voice will be not be filtered to sound like a VHF radio. Generally you want to leave this box unchecked so that the audio is realistic. However, if you are having a hard time understanding what ATC is saying, checking this box might help. The Push-To-Talk (PTT) Tab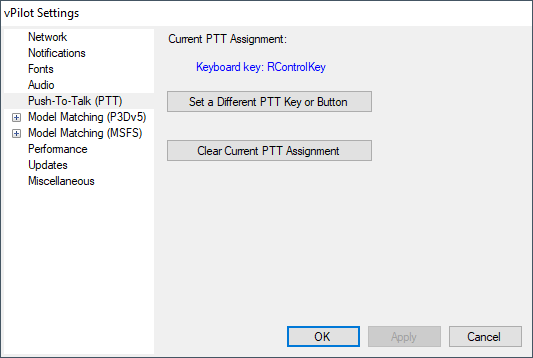
In the Push to Talk (PTT) Assignment section, you can choose which keyboard key or joystick/yoke button you wish to use for PTT. Simply press the button labeled "Set new PTT Key or Button" and then press the keyboard key or joystick/yoke button that you want to use for PTT. vPilot will detect the keystroke or button press and update the "Current PTT Assignment" accordingly. Note that if you want to use a keyboard key for PTT, and you run FSX/P3D/MSFS as an administrator, you must also run vPilot as an administrator for the key press to be recognized. If you do not wish to use voice on VATSIM, press the "Clear Current PTT Assignment" button. The Model Matching Tabs
Refer to the Model Matching section below for more information about how model matching works in vPilot 2.x. You will have one tab for each supported simulator that was detected on your system. The Model Matching - Advanced Tabs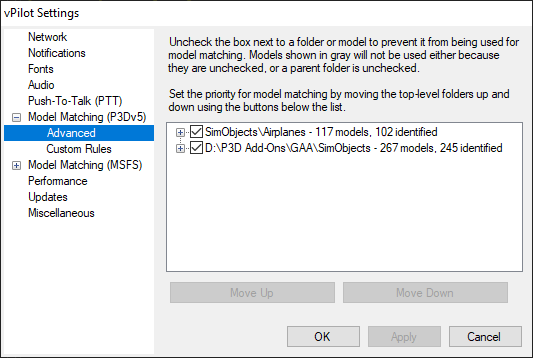
This section allows you to exclude models (either individually or as an entire folder) from use in model matching. You can also prioritize folders by rearranging them in this list using the "Move Up" and "Move Down" buttons. Folders higher in the list will be searched first for models to use to represent aircraft you encounter while flying online. The Model Matching - Custom Rules Tab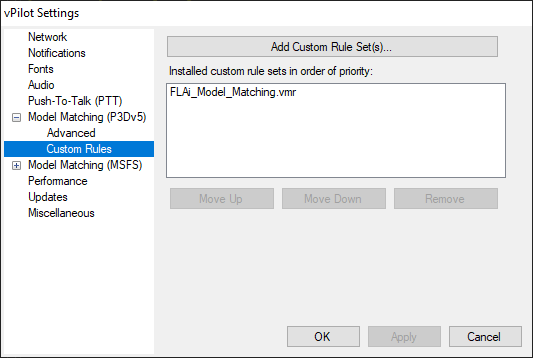
Here you can add a custom model matching rule set by loading the file from your computer's hard drive. You might do this if you created your own file, or if you received a file from another user, or downloaded it from your VA's web site. Custom rules files can be re-ordered to set the priority with which they will be used for model matching. Custom rule sets always take priority over the models found when vPilot automatically scans your hard drive for installed models. The Performance Tab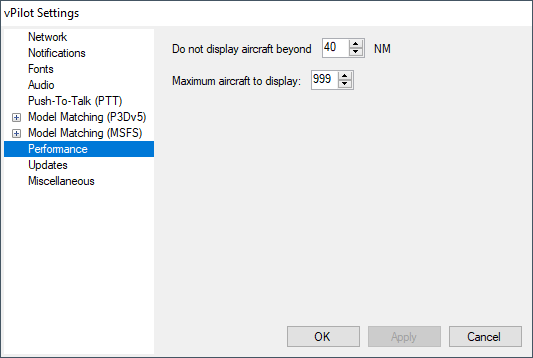
Here you can limit the number of aircraft that vPilot will inject into the simulator. If you find your frame rate suffering when in a crowded area, reduce these numbers. The Updates Tab
The checkbox labeled "Check for vPilot updates" allows you to enable or disable automatic version checking when vPilot is run. Refer to the section on Downloading Updates for details. This option should be left enabled to ensure you are aware when a new version of vPilot is released. This tab also allows you to choose which "Channel" updates are downloaded from. The options are "Stable" and "Beta". Most users should leave this set to "Stable". If you want to get the latest available version of vPilot, which is considered to be in open beta testing, you can change this setting to "Beta". Beta versions of vPilot are not yet thoroughly tested and may contain bugs. The Miscellaneous Tab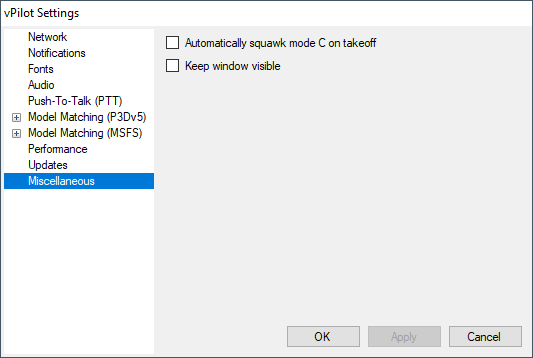
Here you can choose to have vPilot automatically squawk Mode C when your aircraft becomes airborne. You should leave this checkbox unchecked if you are using an add-on aircraft that features SquawkBox transponder integration, since vPilot will then be able to read the transponder mode directly from the aircraft's panel. The checkbox labeled "Keep window visible" allows you to keep the vPilot main window on top of all other windows. Note that this does not work if FSX is running in full screen mode. Model MatchingStarting with version 2.0, model matching in vPilot is much different than in previous versions. It is much more automatic. vPilot 2.0 inspects your computer's registry to see which supported flight simulator(s) you have installed. It then scans the configuration files for those simulators to determine where you have AI traffic models installed. It then scans through those folders looking for information about all the installed models. It then compares that list against a known database of model information (which is downloaded from the vPilot web site when you first start vPilot) so that it knows which models can be used to represent other pilots when you fly on VATSIM. During the scan of your installed models, if vPilot finds models that aren't in the database of known model information, it will try to determine which aircraft type and airline those models can be used for by looking at certain values in the aircraft.cfg files. Each time you start vPilot, it checks to see if any new models have been installed, in which case it re-runs the scan so that the new models can be used for model matching when you fly online. Whenever you encounter another pilot while flying on VATSIM, vPilot looks through all the model information it found during the scan, and picks the best match. If no match can be found, it will display the aircraft using your default model. vPilot will choose a default model for you, but if you want to use a different default model, you can change it by entering a different model title in the Default Model text box on the Model Matching tab in the Settings window. For example, to use the default blue & gold Cessna 172 included with FSX as your default model, you would enter "Cessna Skyhawk 172SP Paint1". This value can be found on the "title=" line of the following section of the aircraft.cfg file located in the SimObjects\Airplanes\C172 folder within your FSX installation folder:
[fltsim.0]
title=Cessna Skyhawk 172SP Paint1 sim=Cessna172SP model= panel= sound= texture=1 kb_checklists=Cessna172SP_check kb_reference=Cessna172SP_ref atc_id=G-BAFM ui_manufacturer="Cessna" ui_type="C172SP Skyhawk" ui_variation=" Blue, Gold" ui_typerole="Single Engine Prop" ui_createdby="Microsoft Corporation" description="A stable and trustworthy plane, most pilots... Creating Custom Model Matching RulesIn addition to the automatic model matching system described above, vPilot provides a way for you to create custom model matching rules if you want to have more fine-grained control over the model matching process, or if you want to be able to use models that are not part of the vPilot model matching database, such as a set of models for a virtual airline. You can load custom rule sets into vPilot by pressing the Add Custom Rule Set(s) button on the Custom Rules sub-tab under the Model Matching tab in the Settings window. The custom rule set files can either be created by you, or downloaded from your virtual airline's web site, or from any other source. Note that custom rule sets always take priority over the automatic model matching. In other words, vPilot will always look for a match in your custom rule sets before looking for a match using the results of the automatic model scan. To build your own rule set, create an XML file using the following template:
<?xml version="1.0" encoding="utf-8"?>
<ModelMatchRuleSet> </ModelMatchRuleSet> Insert your custom rules between lines 2 and 3. The XML format for the rules is explained below. Model Matching Rules ExplainedHere is an excerpt from one of the Ultimate Traffic 2 rule sets:
<ModelMatchRule CallsignPrefix="BAW" TypeCode="B733" ModelName="F1UT2_733.BA.BA" />
<ModelMatchRule CallsignPrefix="COA" TypeCode="B733" ModelName="F1UT2_733.CO.CO" /> <ModelMatchRule CallsignPrefix="UAL" TypeCode="B733" ModelName="F1UT2_733.UA.UA" /> <ModelMatchRule CallsignPrefix="AWE" TypeCode="B733" ModelName="F1UT2_733.US.US" /> Each rule has a CallsignPrefix, a TypeCode, and a ModelName. When a new aircraft is encountered while flying online, vPilot scans through all the rule sets you have installed, line by line, until it finds a match. In order for a line to be considered a match, the aircraft's callsign must start with the CallsignPrefix defined in the rule, if any. The TypeCode must also match. If both of these match, the aircraft will be added to your simulator session using the model name specified in the rule. The model name for your installed model sets can be found in the "title=" line of the aircraft.cfg file. Rule sets can also specify a Callsign value instead of a CallsignPrefix. This is for when you want to use a specific model for a specific callsign. The aircraft's callsign must match the Callsign value exactly for this rule to match. This can be useful for VAs that use a specific callsign for each member, and you want to use a specific livery for each member. For non-airline aircraft, such as general aviation aircraft, you can leave the CallsignPrefix blank, or omit it completely, in which case vPilot will match only based on the TypeCode value. For example, the following rule will match ANY C172, regardless of the callsign:
<ModelMatchRule TypeCode="C172" ModelName="Cessna Skyhawk 172SP" />
You can also specify multiple values in the ModelName field. vPilot will choose one of them at random if the rule results in a match. This is useful for airlines that have multiple liveries for the same aircraft type, such as JetBlue or Frontier. The model names must be separated by double forward slashes. Here is an example from the MyTraffic3D rule set for JetBlue:
<ModelMatchRule CallsignPrefix="JBU" TypeCode="A320" ModelName="A320 MyPaint52//A320 MyPaint82//A320 MyPaint119//A320 MyPaint120" />
This also works for rules that have no CallsignPrefix. Here is an example from the FSX Default Aircraft rule set which will cause one of these C172 paint jobs to be chosen at random for any C172 encountered on the network:
<ModelMatchRule TypeCode="C172" ModelName="Cessna Skyhawk 172SP//Cessna Skyhawk 172SP Paint1//Cessna Skyhawk 172SP Paint2//Cessna Skyhawk 172SP Paint3//Cessna Skyhawk 172SP Paint4//Cessna Skyhawk 172SP G1000" />
Rules can also contain a flight number range, to allow for airlines that fly for multiple larger carriers, using a different range of flight numbers for each carrier. Below are some example rules for SkyWest Airlines and their code share flight numbers for Delta Connection and United Express. Notice that you can specify multiple rules if there are multiple flight number ranges for the same carrier:
<ModelMatchRule CallsignPrefix="SKW" FlightNumberRange="4439-4858" TypeCode="CRJ2" ModelName="AIM CRJ200_Delta Connection_Skywest" />
<ModelMatchRule CallsignPrefix="SKW" FlightNumberRange="9780-9784" TypeCode="CRJ2" ModelName="AIM CRJ200_Delta Connection_Skywest" /> <ModelMatchRule CallsignPrefix="SKW" FlightNumberRange="4965-4974" TypeCode="CRJ2" ModelName="AIM CRJ200_ual skwywest nc" /> <ModelMatchRule CallsignPrefix="SKW" FlightNumberRange="5156-5269" TypeCode="CRJ2" ModelName="AIM CRJ200_ual skwywest nc" /> <ModelMatchRule CallsignPrefix="SKW" FlightNumberRange="5480-5659" TypeCode="CRJ2" ModelName="AIM CRJ200_ual skwywest nc" /> <ModelMatchRule CallsignPrefix="SKW" FlightNumberRange="6190-6539" TypeCode="CRJ2" ModelName="AIM CRJ200_ual skwywest nc" /> vPilot also makes use of a database of similar aircraft types which it downloads when vPilot first start up. This database contains lists of aircraft type codes that look similar to each other. vPilot will use entries in this database to find model matching rules for similar aircraft types if an exact match cannot be found. For example, if an aircraft is encountered with callsign "DAL123" and type code "B733", but no matching rule can be found, vPilot will look for rules with a CallsignPrefix of "DAL" and a TypeCode of "B732", "B734", etc. Note that vPilot will make multiple passes through the custom rule sets, looking for more specific matches first. The logic for each pass is as follows:
Continuing with the DAL123 B732 example from above, during pass #1, vPilot will look for a rule with a CallsignPrefix of "DAL" (or a Callsign value of "DAL123") an a TypeCode of B732. If none is found, vPilot will make another pass, looking for a rule with a CallsignPrefix of "DAL" and a TypeCode matching one of the codes listed as similar to the B732, such as B733, B734, etc. If no match is found, another pass will be made, looking for a rule with no CallsignPrefix or Callsign specified, and a TypeCode of B732. If no match is found, a final pass will be made, looking for a rule with no CallsignPrefix or Callsign specified, and a TypeCode matching one of he codes listed as similar to the B732. Finally, if no match is found in any of these four passes, the aircraft will be added to the simulator session using the Default Model specified in your Model Matching Settings. Connecting to VATSIM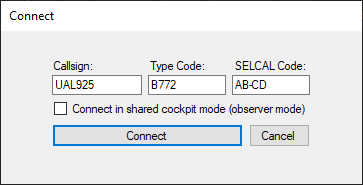
To connect to VATSIM, click the Connect button. You will see the Connect window. At a minimum, enter your callsign and aircraft type. The SELCAL code is optional. Press the Connect button when you are ready to go online. If the connection was successful, you will see a message in the main message area, and the Connect button will light up in green and its label will now read "Disconnect." If there are controllers within range of your location, they will appear in the controller list, and you can tune their frequency in order to communicate with them. See below for details on using the shared cockpit (observer) mode. Controlling the TransponderWhile flying on VATSIM, you will need to toggle your transponder between Standby Mode, and Mode C. Mode C is used when you enter the active runway and any time you are airborne. Mode C allows controllers to see your altitude on their scope. Mode C is also used on the ground at some airports if they are using an airport surface surveillance system such as ASDE-X. This will be noted on the airport diagram or in the controller's ATIS information. There are three ways for you to set your transponder mode with vPilot. If the add-on aircraft you are flying has SquawkBox transponder integration, then vPilot will detect transponder mode changes when you toggle the mode using the aircraft panel within the sim. If this happens, you'll see the Mode C button on the vPilot main window light up in green when the transponder is in Mode C. If the aircraft does not support SquawkBox integration, then you'll need to manage the transponder mode yourself, simply by clicking the Mode C button on the vPilot main window. Mode C is indicated by this button being lit up in green, otherwise it is in standby mode. There is also a checkbox in the General Settings which allows you to configure vPilot such that it will automatically squawk Mode C (also referred to as "Squawking Normal") when your aircraft becomes airborne. The final way to manage your transponder mode is by using the Add-ons menu within the sim. When vPilot is running, there will be options added to this menu, allowing you to squawk Mode C or Standby. These three options also apply for squawking ident. A controller may ask you to squawk ident when you first check in on a frequency. This causes your data tag to appear differently on his scope, helping him locate you in his airspace. If you are asked to squawk ident, you can press the ident button on your aircraft's panel (if the add-on aircraft has SquawkBox transponder integration,) or you can press the Ident button on vPilot's main window, or you can choose the Squawk Ident option from the Add-ons menu within the sim. The Ident button on vPilot's main window will light up green when vPilot has sent the ident signal to the network, at which point it will revert to the regular color. Communicating with ControllersWhen you connect to VATSIM, all controllers in range will be displayed in the controller list along the left side of vPilot's main window, grouped by facility type. Each entry has the controller's callsign and frequency. If you hover your mouse over the entry, a popup label will be displayed containing the controller's name. In order to communicate with a controller, simply tune the controller's frequency in your aircraft's radio panel using either the COM1 or COM2 radio. The radio must also be selected for transmit and receive. (Or you can tune a controller for receive only if you wish.) At the top right corner of vPilot's main window, you will see the TX/RX labels turn white when transmit and receive are enabled for that COM radio. Note that your aircraft's avionics must have power in order to communicate with controllers. 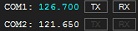
If you are connected to the voice server, the frequencies shown will be colored blue as shown in the image at right. Otherwise they will be colored in white. While connected to a voice channel, the TX/RX lights will light up when you are transmitting or receiving voice on the frequency. You can be connected to more than one controller at the same time, by tuning one controller's frequency on COM1, and the other on COM2. Only one of them can be enabled for transmit at a time, though. To communicate with a controller via text radio messages, ensure you have the main Messages tab selected, enter your message in the command line at the bottom of the message area, and press enter. This will send your text message out as text radio on whichever COM frequency you have selected for transmit. Incoming text radio messages are shown in the main messages area. If you are listening on more than one COM radio, the text radio messages will be prefixed with the frequency it arrived on. If an incoming text radio message is directed at you specifically, a tone will sound and the message will appear in a light blue color. text radio messages directed towards other pilots (or toward no one in particular) will appear in a gray color. 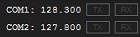
Remember, your avionics must be powered up in order for comms to work. If your avionics are not powered, the TX and RX lights will be grayed out for both COM radios, as shown in the image at right. SELCALIf you specified a SELCAL (Selective Calling) code when connecting to VATSIM, controllers have the ability to send a SELCAL alert to your aircraft using that code. This is used to get your attention during long flights over areas where standard VHF radio doesn't have enough range, and noisy HF frequencies are used instead. The pilot will typically turn down the volume so he doesn't have to listen to the HF static, and controllers will send a SELCAL alert to get his attention when they need to talk to him over HF. VATSIM does not simulate HF frequencies, but oceanic controllers will still simulate the SELCAL process for the purposes of realism. If a SELCAL alert is received for your SELCAL code, a tone will sound and a message will be displayed in the main messages area. Requesting Controller Information (A.K.A Text ATIS)Each controller on VATSIM maintains their controller information, also known as the controller ATIS. To request this information, double-click on the controller in the controller list. The information will appear as green lines in the main message area. You can also request controller information using the .atis command. Refer to the section on Dot Commands for details. Filing a Flight PlanAs of version 3.8, vPilot no longer includes a flight plan form. It was removed in order to have all flight plans filed through the VATSIM flight plan form, which supports the ICAO format. Click on the Flight Plan button to open the form in your browser. Private MessagesDuring the course of your flight on VATSIM, you may wish to contact other users (pilots or controllers) via private message, or they may contact you by private message. When a new private message arrives, a tab will be added showing the sender's callsign, highlighted in light blue. When you click on the tab, the message area for that chat will be displayed and the tab text will turn light gray. The first line of the chat messages will show the user's real name. If a new message comes in while the tab is not active, the callsign will turn light blue again. To send a private message, type your message in the command line at the bottom of the chat tab, just below the message area, and press enter. Your outgoing messages will appear in the message area with in light gray. Incoming messages appear in light blue. You can initiate a private chat session by right clicking on a controller in the controller list and choosing "Open Private Chat" from the resulting popup menu. This will create a new tab (or switch to the existing tab if any) and you can then type your message. You can also initiate a private chat session using the .chat command. Refer to the section on Dot Commands for details. Dot CommandsvPilot supports the following dot commands, which can be entered on the command line just below the main message area or at the bottom of any private chat tab:
Disconnecting from VATSIMWhen you are ready to disconnect from VATSIM, simply press the Disconnect button on vPilot's main window. The controller list will be cleared and all aircraft that vPilot added to the sim session will be removed. You will also be removed from any active voice channels. Note that vPilot will automatically disconnect from the network if you shut down the sim. You will also be temporarily disconnected and reconnected if you switch airports or load a different flight in the sim. Downloading Updates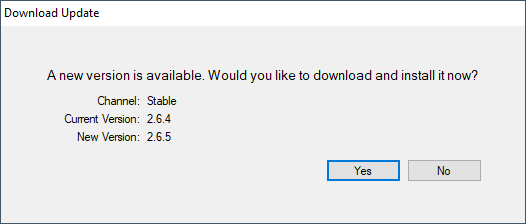
Each time you start vPilot, it makes a request to the vPilot web server to see if there might be a newer version available. If there is, you will be prompted with a message similar to the one shown at right. If you choose to download an avilable update, vPilot will download the updated installer, showing a progress bar. When the download is complete, vPilot will exit and the installer will be run. After the update is installed, you will have the option of starting vPilot again. Running vPilot Over a NetworkIf you would like to run the main vPilot user interface on a machine other than the one that runs your simulator, you can do so by running vPilot in a split networked configuration. In this configuration, you will actually run two copies of vPilot. The first copy runs in "host" mode on the same machine as the simulator. The second copy runs in "remote" mode on the other computer. The remote copy communicates with the host copy over the network. To launch vPilot in host or remote mode, you can use the special shortcuts that were created in your start menu programs list when you installed vPilot. Again, on the sim computer, launch vPilot in "host" mode. On the other computer, the one where you want to see the vPilot user interface, launch vPilot in "remote" mode. The first time you launch vPilot in remote mode, it will prompt you to go into the Settings window and enter the IP address of the host machine. You can also configure which port vPilot will use to connect to the host. The port setting must be configured for the same value in both the host and remote copies. This port must also be opened in the firewall on the host computer. Note that both copies must be running the exact same version of vPilot in order for them to connect to each other. You'll notice that there are two shortcuts for starting vPilot in host mode and two for starting it in remote mode. One shortcut includes voice communications, and one doesn't. This allows you to choose which machine will handle connections to the VATSIM voice servers for communicating with ATC. You must choose either the host or the remote to handle voice communications. You cannot have voice comms running on both the host and the remote at the same time. Shared Cockpit (Observer) ModevPilot supports the ability to connect in observer mode so that your aircraft does not appear to other users on the network. This feature is intended for use with shared cockpit operations. To use this feature, the first pilot should connect to the network normally, and the second pilot should connect in observer mode. The second pilot must use the same callsign as the first pilot, with a letter appended to the end. For example, if the first pilot's callsign is JBU123, the second pilot should use JBU123A. (Any letter will do, it doesn't have to be A.) By doing this, the second pilot's copy of vPilot will not try to display the first pilot's aircraft in the sim. Getting HelpIf, after reading the documentation, you still have a question about installing, configuring or using vPilot, please post your message in the VATSIM vPilot Forum. |
| © Copyright 2013-2026 Ross Alan Carlson - All rights reserved. |